Writing · 20 July 2022
Building .NET Maui Apps on Linux-Based Operating Systems
Building .NET Maui applications on Linux isn't as easy as it is on Windows or Mac. but Jamie found a way.

To readers from the future
The following update was provided by Jamie a year after this blog post was published:
💬 Quote
Hi everyone, Jamie here.
The blog post that you’re about to read was written and published before the .NET MAUI for VS Code extension was created. As such, the content of this blog post is very, very out of date.
If you’re building .NET MAUI apps using a Linux-on-the-desktop, can I recommend that you give the .NET MAUI for VS Code extension a shot? It’s really rather good.
Anyway, thanks everyone and happy coding.
Jamie; 08/11/2023
The cover image for this post is by Daniel Romero
This blog post was written by Jamie.
Introduction
.NET Maui is the next evolution of Xamarin Forms, and allows for a true “write once; run anywhere” experience for .NET applications. .NET Maui applications can be run on:
- Windows 10 or above
- Mac OS Catalina or above (via Mac Catalyst)
- iOS*
- Android (API v 31 or above)*
- Tizen
* and a large number of devices which can run these OSes; such as the Apple Watches or Android Smart Watches
there are a few exceptions and corner cases, though. So read the official documentation
This is practically anywhere.. but not quite.
There are two “problems” with .NET Maui (at the time of publishing this blog post):
- On Windows, you need the latest Visual Studio 2022 Preview
- There are no native build tools for .NET Maui on Linux*
* while proof-reading this post, I was informed that Rider 2022.9 EAP has experimental support for .NET Maui projects. See the very end of this blog post for an update
There’s Rider, which has great support for all of the XAML based UI frameworks (like AvaloniaUI, Uno Project, and .NET Maui) via plugins. But the folks over at JetBrains have only provided details on setting up .NET Maui with Rider for MacOS
at the time of publishing this blog post
There are a number of “issues” on the Rider issue tracker, asking for .NET Maui support - such as this one. But since .NET Maui is so new, most of the tooling is still being explored. For instance, here’s a link to a GitHub issue where the authors are actively discussing how to leverage .NET Maui as part of the dotnet CLI: https://github.com/dotnet/xamarin/issues/26.
In fact, .NET Maui is so new that some of the documentation for .NET Maui isn’t evolving fast enough.
.NET Maui on Linux
So .NET Maui is cross-platform, right?
Yup. But, and it’s a big but, there isn’t any tooling for either targeting or building on Linux-based OSes yet.
The reason for not targeting Linux-based OSes makes sense. The Arch Wiki has a large list of just some of the desktop environments for Linux distros. You see, on Windows and MacOS there’s just one way to draw a desktop and manage windows (Aqua on MacOS, and Fluent on Windows). But on Linux there are quite a few different desktop environments and design languages. Sure, some of them share similarities, and some are built on others; but some of them wildly different form everything else.
As such, the .NET Maui team have said that support for .NET Maui on the many different Linux distros will be:
supported by the community
And, in my opinion, that’s fair enough. .NET Maui is still very new, it’s not yet been commercially proven on the platforms which is does support
though I’m sure that it prove to be an amazing tool in every .NET developers pocket
and “Linux” is a huge target to hit.
So You Can’t Build .NET Maui Apps on Linux?
Actually, you can. And I figured out how to yesterday, as you can see in this twitter thread:
I’m super close to being able to build and run #dotnetmaui apps (specifically Android ones) on my Linux desktop.
Just getting an esoteric Xamarin CLI error now.
If I can get it to work, I’ll write up a blog post about it
So how did I do it?
The first thing you need to know is that the dev-loop for this is rather long. Like, seriously long. Like, five minutes long.
With both Visual Studio 2002 Preview and Visual Studio for Mac, you can run the app and make changes at the same time, and because of Hot Reload the changes will be on your emulator, simulator, or connected device almost as soon as you hit the save button.
But the Linux story is a little different. Plus, it only supports Android
you need a Mac somewhere on your network to build and push to an iOS device or simulator, because of Apple’s licenses
But as long as you have an Android device, with developer mode unlocked, and USB debugging enabled, you can build and deploy to it from Linux. And here’s how:
Building & Deploying Using Linux
Firstly, here be dragons. There’s a big chance that things might change in the coming weeks and months
for reference, this blog post was published on July 20th, 2022
as such, take everything here with a huge pinch of salt.
That being said, here are the steps I used to build and deploy a .NET Maui app from a machine running PopOS.
Step 1: Install The .NET Maui Workload
assuming you have .NET installed, if not: https://get.dot.net
Before you can do anything, you need the .NET Maui tools. You can install them using dotnet workload install maui-android, which you may need to elevate (using sudo or the equivalent). This will install both the .NET CLI build tools and libraries for building Android applications, and the .NET project templates.
Assuming this was successful, you’ll be able to see the Android App template if you run dotnet new --list. Here’s a reduced version of the output that I got, yours may vary:
These templates matched your input:

Template Name                                 Short Name          Language    Tags
--------------------------------------------  ------------------  ----------  ---------------------------------------------------------
.NET MAUI App                                 maui                [C#]        MAUI/Android/iOS/macOS/Mac Catalyst/Windows/Tizen
.NET MAUI Blazor App                          maui-blazor         [C#]        MAUI/Android/iOS/macOS/Mac Catalyst/Windows/Tizen/Blazor
.NET MAUI Class Library                       mauilib             [C#]        MAUI/Android/iOS/macOS/Mac Catalyst/Windows/Tizen
.NET MAUI ContentPage (C#)                    maui-page-csharp    [C#]        MAUI/Android/iOS/macOS/Mac Catalyst/WinUI/Tizen/Xaml/Code
.NET MAUI ContentPage (XAML)                  maui-page-xaml      [C#]        MAUI/Android/iOS/macOS/Mac Catalyst/WinUI/Tizen/Xaml/Code
.NET MAUI ContentView (C#)                    maui-view-csharp    [C#]        MAUI/Android/iOS/macOS/Mac Catalyst/WinUI/Tizen/Xaml/Code
.NET MAUI ContentView (XAML)                  maui-view-xaml      [C#]        MAUI/Android/iOS/macOS/Mac Catalyst/WinUI/Tizen/Xaml/Code
.NET MAUI ResourceDictionary (XAML)           maui-dict-xaml      [C#]        MAUI/Android/iOS/macOS/Mac Catalyst/WinUI/Xaml/Code
... more templates here
In the above snippet, I’ve removed the templates which are not related .NET Maui. As you can see, the first template (called “.NET Maui App”) is the one we want.
Step 2. Create a .NET Maui Application
With the workload installed, and the project template in place, it’s time to scaffold a new application using the .NET Maui template. You can do this by running: dotnet new maui -n MyMauiApplication.
This will create a new project based on the .NET Maui template, set the namespace to MyMauiApplication, and place all of the tiles in a directory called “MyMauiApplication”.
This new application will be setup to build for all sorts of devices and platforms. If you open the csproj, you’ll see all of the platforms that it can be built for:
<Project Sdk="Microsoft.NET.Sdk">
  <PropertyGroup>
    <TargetFrameworks>net6.0-android;net6.0-ios;net6.0-maccatalyst</TargetFrameworks>
    <TargetFrameworks Condition="$([MSBuild]::IsOSPlatform('windows'))">$(TargetFrameworks);net6.0-windows10.0.19041.0</TargetFrameworks>

    <SupportedOSPlatformVersion Condition="$([MSBuild]::GetTargetPlatformIdentifier('$(TargetFramework)')) == 'ios'">14.2</SupportedOSPlatformVersion>
    <SupportedOSPlatformVersion Condition="$([MSBuild]::GetTargetPlatformIdentifier('$(TargetFramework)')) == 'maccatalyst'">14.0</SupportedOSPlatformVersion>
    <SupportedOSPlatformVersion Condition="$([MSBuild]::GetTargetPlatformIdentifier('$(TargetFramework)')) == 'android'">21.0</SupportedOSPlatformVersion>
    <SupportedOSPlatformVersion Condition="$([MSBuild]::GetTargetPlatformIdentifier('$(TargetFramework)')) == 'windows'">10.0.17763.0</SupportedOSPlatformVersion>
    <TargetPlatformMinVersion Condition="$([MSBuild]::GetTargetPlatformIdentifier('$(TargetFramework)')) == 'windows'">10.0.17763.0</TargetPlatformMinVersion>
    <SupportedOSPlatformVersion Condition="$([MSBuild]::GetTargetPlatformIdentifier('$(TargetFramework)')) == 'tizen'">6.5</SupportedOSPlatformVersion>
  </PropertyGroup>
The above snippet shows that we can build this application for:
- iOS 14.2
- Mac Catalyst 14.0
- Android 21
- Windows 10.0.17763.0
- Tizen 6.5
But we can only build for one of those on a Linux=-based OS, so we’re best of changing the above to something like the following (for now):
<Project Sdk="Microsoft.NET.Sdk">
  <PropertyGroup>
    <TargetFrameworks>net6.0-android;</TargetFrameworks>

    <SupportedOSPlatformVersion Condition="$([MSBuild]::GetTargetPlatformIdentifier('$(TargetFramework)')) == 'android'">21.0</SupportedOSPlatformVersion>
  </PropertyGroup>
This tells the .NET tooling that we only want to build this application for Android
technically, we don’t have to do this. It just cleans up your csproj file.
Step 3. Install the Android SDK
You almost have everything that you need in order to build this code base. The one remaining piece is the Android SDK, which you can get as part of the installation process for Android Studio.
I use the JetBrains suite of IDEs, and the JetBrains Toolbox has an installer for Android Studio:
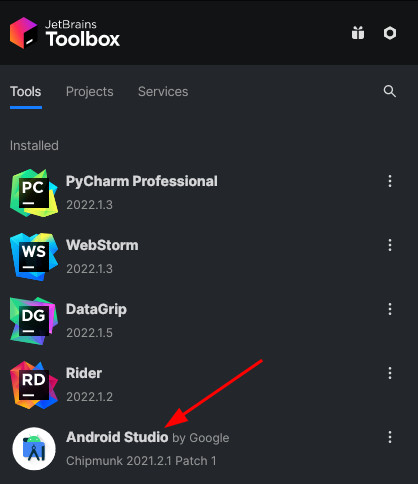
However you install it, once it has been installed open it up and run through the wizard. Make sure to install an Android SDK, and note down the path to the Android SDK installation directory
on my machine it was /home/jamietaylor/Android/Sdk, but yours may vary
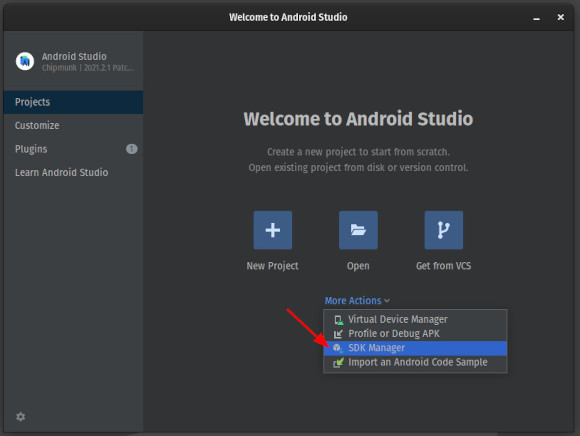
Then open Android Studio, click “More Actions” and choose “SDK Manager” from the menu:
Now ensure that “Android 12 (S)” is checked and installed:
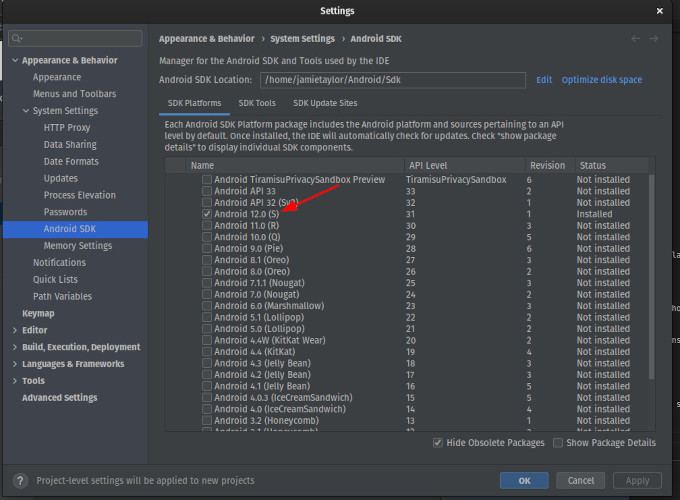
If it isn’t installed, follow the prompts on-screen to install it. The .NET tooling will need all of the files which come with this SDK version in order to build the app - it will make use of the Android.jar file found in the SDK directory
on my machine it was /home/jamietaylor/Android/Sdk/android-31/Android.jar, but yours may vary
Step 4. Unlock USB Debugging on Your Android Device
The tl;dr is:
- Head to Settings > About Phone
- Tap “Build Number” seven times
- Open the newly unlocked Developer Options
- Enable them
- Look for “USB Debugging” and enable it
Some of the paths for these options differ by Android version number and vendor; check this page for the most up to date steps.
WARNING: DOING THIS ON YOUR DAILY DRIVER ANDROID DEVICE MAY REDUCE THE SECURITY OF IT
We now need to install the ADB (Android Debug Bridge) and set up some user permissions in order to communicate with your phone over USB in developer mode. Firstly install adb: sudo apt install adb, then run the following command to set up udev permissions: sudo usermod -aG plugdev $LOGNAME
Before we continue, let’s discuss what that last command does:
sudo usermod -aG plugdev $LOGNAME
instructs bash to modify the permissions of a user (usermod) appending (-a) a group (-G) called plugdev. The user that we are appending permissions to is $LOGNAME, this is an environment variable which contains the name of the user who is executing the current shell context.
Never run commands you find on the internet, unless you understand what they do, and are willing to accept the risk of whatever they might do to your computer. Especially if they need elevation (i.e. sudo).
You can verify my explanation here, where I have placed the above command (sans sudo) into Explain Shell
which is a great resource for explaining Linux shell commands
Because you’ve altered the permissions of your user account, you’ll need to log out and log back in for them to take effect.
Now, get the USB cable for your phone and attach your phone to your computer. You might be asked to accept an SSH key, this is because your computer and phone are attempting to set up an SSH connection. This is expected behavior
WARNING: THIS CREATES A POTENTIAL ATTACK SURFACE ON YOUR PHONE WHILST IT IS CONNECTED TO YOUR COMPUTER
Ensure that your device is detected by ADB by running: adb devices. You should get some output similar to the following:
List of devices attached
12345678        device
Where 12345678 is a GUID representing your device.
Step 5. Build and Deploy to Your Android Device
Now that you have everything setup, building and deploying to your device is a matter of running: dotnet build -t:Run -f net6.0-android /p:AndroidSdkDirectory=/home/jamietaylor/Android/Sdk/ and replacing /home/jamietaylor/Android/Sdk/ with the directory where the Android SDK is installed to.
After a few minutes of building
building for Android takes a LONG time
You should see the application fire up on your device. This is because the application was built, then pushed over to the device and installed. Once it is installed, the application is started.
The .NET tooling uses the adb instance to detect a device which has the relevant Android version (in our case Android 12, known as “S”, which has API version 31), and pushes the APK file to that device.
Here’s a video, captured on my OnePlus 6T, as the .NET Maui app was deployed to it and started:
you’ll have to hit ‘play’ as I dislike videos that auto play
And voila, your .NET Maui app was built using a Linux-based operating system, and deployed directly to your device.
Caveats of This Approach
Because this will build and deploy the application to your device WITHOUT any way of debugging, you wont get a rich debugging and editing experience. What I mean by that is you wont get the Hot Reloading that Visual Studio 2022 Preview or Visual Studio for Mac give you.
So each time you want to see a change on your device, you’ll need to re-run dotnet build -t:Run -f net6.0-android /p:AndroidSdkDirectory=/home/jamietaylor/Android/Sdk/
replacing /home/jamietaylor/Android/Sdk/ for your Android SDK installation path
wait for the app to be rebuilt, deployed, and started on your device.
On a clean build of the project template code, this took 268.82 seconds (almost 5 minutes) to run to completion. To get this time, I ran dotnet clean followed by time dotnet build -t:Run -f net6.0-android /p:AndroidSdkDirectory=/home/jamietaylor/Android/Sdk/.
the machine I ran this on has an Intel i7-10875H with 16 cores @ 5.100GHz with 32GB of RAM
What If I Don’t Have a Physical Device?
In Android Studio, you can set up a virtual device by choosing “More Actions” then “Virtual Device Manager”:

From here click “Create Device”
found in the top right corner of the screen
then choose “Phone” as the category of device, and choose a device to emulate
I chose "Pixel 5", but it shouldn’t matter
and ensure that “S” is chosen as the system image:
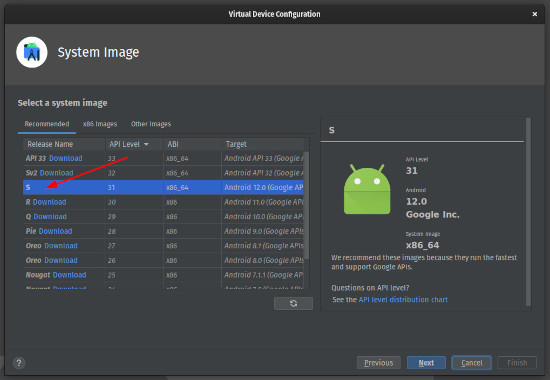
‘S’ here is API version 31
Then complete the wizard - if required, your computer will download the system image from Google. Once this is completed, and you have finished the wizard, you will see something like the following:
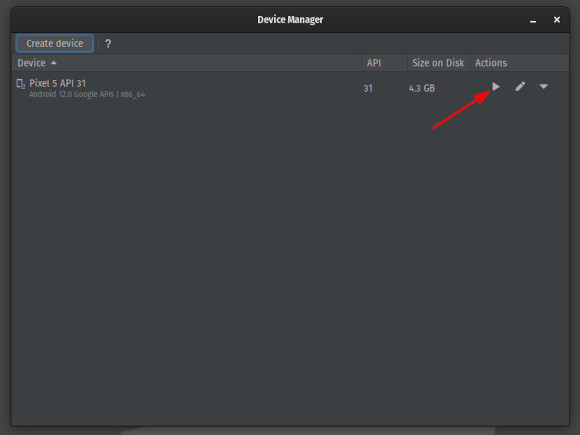
Click the “play” button in this window, and an Android device emulator should be shown on screen. This emulator will run the device image that you selected in the previous step - this may take a few moments to start.
Once it has started, run adb devices to ensure that the emulated device is picked up by ADB. You should get output similar to the following:
List of devices attached
12345678        device
Where 12345678 is a GUID representing your emulated device.
Running the build command dotnet build -t:Run -f net6.0-android /p:AndroidSdkDirectory=/home/jamietaylor/Android/Sdk/ will cause the .NET Maui app to be built and deployed to your emulated device:
This process suffers with the same problem as using a real device: the dev loop is incredibly slow, and there is no Hot Reload. So when you make a change to your application
any change, even a subtle XAML change
the application will have to be rebuilt (taking around 5 minutes on my machine) and redeployed.
But it’s a start.
Conclusion
When building .NET Maui Android apps on Linux, there’s no tooling (at the time of publishing) which allows for the rich debugging experience that Visual Studio 2022 Preview and Visual Studio for Mac have. But what I’ve outlined here is a start.
Hopefully, “the community” will step up and invest some time in tooling for building .NET Maui applications using Linux-based operating systems, as I’d love to see Hot Reload when building .NET Maui applications for Android. I can see someone either adapting the Avalonia plugin for Rider, or creating a new set of them.
for those who don’t know, the Avalonia plugin allows for previews of Avalonia UIs within the Rider tooling
Either way, I’ve sated my curiosity for now. And I’m happy with waiting for a 5 minute build and deploy loop
for now
when building my .NET Maui Android apps.
That being said, the 2022.9 EAP version of Rider has experimental .NET Maui support baked in, but I was unable to get it to work. This proves that there is interest by the .NET Maui team, but that it’s still a work in progress. It does, however, show great prospects for .NET Maui tooling for Linux-based OSes.