
The cover image for this post is by Dan Meyers
This blog post was written by Jamie.
TL;DR
As Abel Wang was proud of saying
Don’t accept the defaults!
Click here for the actual solution to the problem I struggled with for three days.
Introduction
If you’ve been following along with our 2022 Apprentice Dev Blogs, you’ll know that Alex (our apprentice) has been working on an application for us. We started by having them build a WinForms app with one layer
i.e. everything was done in the UI
then introduced nTier architecture along with SOLID principles. From there, we built toward a four layer application:
- UI (WinForms)
- Business Logic
- Generic Repository
- Database
This made complete sense, as we would be able to separate the concerns of the application, program to interfaces, and apply the basics of Domain-Driven Design. And it lent itself to our ultimate goal of swapping WinForms for .NET Maui.
as a quick reminder, Alex started this project before .NET Maui saw a version one release; so they’ve been right on the bleeding edge of the technology throughout their apprenticeship with us
But we ran into some problems along the way. Some of these were problems of my own creation, and some were slight weirdness. In this blog post, I want to talk through some of these issues, because they might happen to you too.
Before we get to that: at the time of writing, Alex’s project is still in progress and they have another two weeks with us.
Just Copy Those Projects
Because we already had a set of projects which worked, when Alex added a non-functional .NET Maui UI (with just two screens) I told them to just copy the projects under the UI over to the .NET Maui solution and re-use them. After all, that was the plan right? Implement DI, bring over the interfaces and implementations, and it will all just work.
Except that it didn’t.
It turns out that there’s a new project type with .NET Maui: A .NET Maui class project. They look a little different from standard csproj files because they need to make your code cross-platform:
<Project Sdk="Microsoft.NET.Sdk">

  <PropertyGroup>
    <TargetFrameworks>net6.0;net6.0-android;net6.0-ios;net6.0-maccatalyst</TargetFrameworks>
    <TargetFrameworks Condition="$([MSBuild]::IsOSPlatform('windows'))">$(TargetFrameworks);net6.0-windows10.0.19041.0</TargetFrameworks>
    <!-- Uncomment to also build the tizen app. You will need to install tizen by following this: https://github.com/Samsung/Tizen.NET -->
    <!-- <TargetFrameworks>$(TargetFrameworks);net6.0-tizen</TargetFrameworks> -->
    <UseMaui>true</UseMaui>
    <SingleProject>true</SingleProject>
    <ImplicitUsings>enable</ImplicitUsings>

    <SupportedOSPlatformVersion Condition="$([MSBuild]::GetTargetPlatformIdentifier('$(TargetFramework)')) == 'ios'">14.2</SupportedOSPlatformVersion>
    <SupportedOSPlatformVersion Condition="$([MSBuild]::GetTargetPlatformIdentifier('$(TargetFramework)')) == 'maccatalyst'">14.0</SupportedOSPlatformVersion>
    <SupportedOSPlatformVersion Condition="$([MSBuild]::GetTargetPlatformIdentifier('$(TargetFramework)')) == 'android'">21.0</SupportedOSPlatformVersion>
    <SupportedOSPlatformVersion Condition="$([MSBuild]::GetTargetPlatformIdentifier('$(TargetFramework)')) == 'windows'">10.0.17763.0</SupportedOSPlatformVersion>
    <TargetPlatformMinVersion Condition="$([MSBuild]::GetTargetPlatformIdentifier('$(TargetFramework)')) == 'windows'">10.0.17763.0</TargetPlatformMinVersion>
    <SupportedOSPlatformVersion Condition="$([MSBuild]::GetTargetPlatformIdentifier('$(TargetFramework)')) == 'tizen'">6.5</SupportedOSPlatformVersion>
  </PropertyGroup>

</Project>
They also bring a number of different files and directories and files with them; which looks like this:
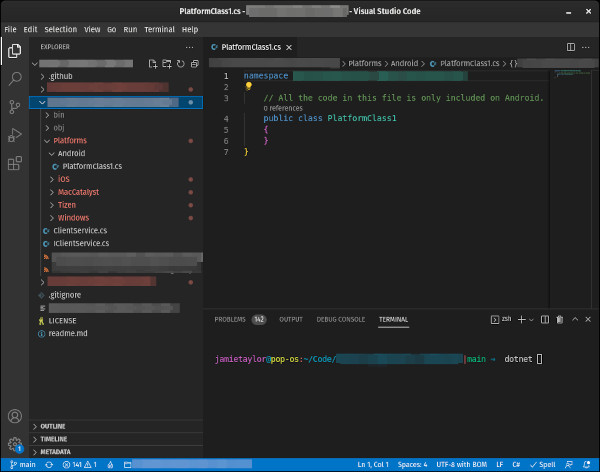
Forgive the censoring here
The PlatformClass1 file is used to include code specifically for that platform. This is a neat idea that gets around littering the code base with #if preprocessors, making the code more readable and easily discoverable.
Without these files and the csproj properties, the solution will still build and run locally (even in the various device emulators); but it will refuse to publish. Which brings me on to…
Not Understanding .NET Maui
It’s safe to say that .NET Maui is a completely new technology. Even though it’s based on Xamarin, there are a tonne of potential pitfalls for someone who has managed to miss the entire XAML revolution (like me). Before this project, I’d heard of the MVVM pattern
my thanks go out to Jim Bennet for explaining it, when I interviewed him in 2019
and I knew the basic idea:
- Put C# code in
- Build a XAML-based UI
- Magic
- iOS and Android apps come out the other end
One of the things that I hadn’t thought about when designing this project for Alex was that the code bases for .NET Maui (and Xamarin) applications aren’t designed the same way as WinForms ones. Those who have experience with both .NET Maui and Xamarin would have baulked when I said that we would simply swap the UI for .NET Maui, as it simply doesn’t work like that.
Firstly, it’s not a good idea to include direct access to a remote database in an app which might end up on the various app stores. This a dreadful idea for security
my fellow security experts will likely be clawing at the screen when they read that we gave app users direct access to the database. But it’s an MVP, it’s allowed… right?
Also the .NET Maui tool chain does something really rather interesting when you build for iOS: it attempts to compress the binaries.
the following is correct as of July 5th, 2022
When you do a release build for iOS, the tooling requires that the binaries are compressed as part of the publish action. If this compression step fails, the publish will fail. You can disable this by adding a PublishTrimmed=false flag to the publish command. Like so:
dotnet build yourProject.csproj -c Release -f net6.0-ios --no-restore -p:PublishTrimmed=false
But that will immediately fail, because that compression step is required in order for a publish to iOS to complete.
Each time we tried to publish for iOS it would fail, because the tooling couldn’t compress the binaries.
This was for an app with two screens:
- A welcome screen
- A record display screen
There wasn’t anything flashy happening in the code, and there were no embedded resources. But we were including Entity Framework Core and a few layers of abstraction. So it couldn’t have been Alex’s code which was failing to compress, which meant that it must have been the libraries we were including.
So…
Hiding The Database Behind An API
I wanted to give Alex the option of publishing for a iOS device, regardless of whether they use one or not. After all, what’s the point of building a cross platform application if you can’t publish it for one of those platforms?
There was another problem too:
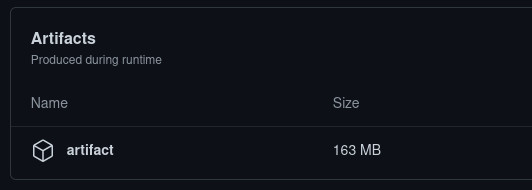
And that’s an app with two screens
We can’t really do a great deal about the size of the application, because it’ll be including a lot of the .NET runtime, our dependencies, and any translation code required in order to run it on the device. But we could make it smaller by reducing our dependencies. And we could do that by putting the database behind a WebApi.
as an update: after doing everything in this blog post, we’ve gotten the app down to ~100MB
Not only would this reduce our dependencies, but it would also make the code more secure because we could then add authentication and authorisation at the API side.
Side note:
We’re a 100% remote company. This meant that Alex was working from a number of different locations during their apprenticeship. Because of the rules in place by the T-Level course, Alex was not allowed to work from home, and was required to work from certified co-working spaces and their educational institution.
Because we had the database on an Azure SQL Server, I had to add new rules to (and remove old rules from) the IP allowlist for the database on a daily basis.
This is a task that takes around 90 seconds (with 80 seconds being spent navigating to the SQL Database firewall settings), but it was toil which would be fixed by putting the database behind an Azure WebApp. This was daily toil, and toil should always be reduced where possible
see this episode of Coding Blocks for a discussion on why reducing toil is a good idea
So I spent the weekend building a WebApi project to hide the database behind. But ran into a HUGE problem when attempting to deploy it:
Been forced to eat a bunch of humble pie today. I’ve created a #dotnet 6 webapi project and attempted to deploy to Azure using the yml that Azure created for me, but the app doesn’t seem to be spinning up.
— dotNetCoreShow (@dotNetCoreShow) Jul 3, 2022
But what do I mean by “huge issue when deploying”?
This was what I was presented with when attempting to access the WebApp, regardless of what I did:
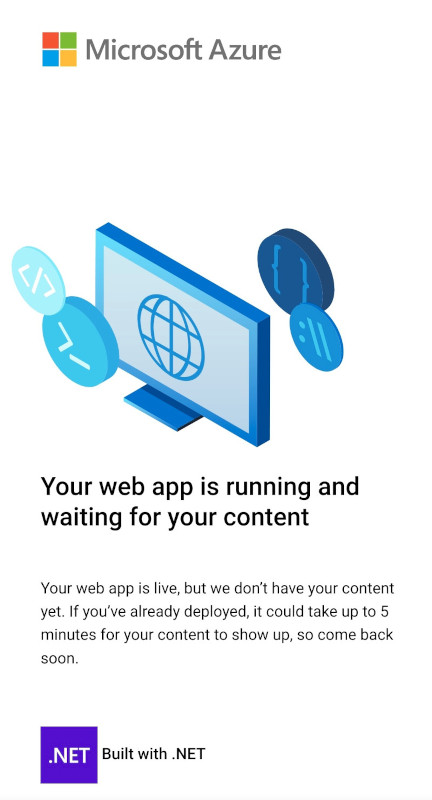
And that’s an app with two screens
For those who don’t know, this is the “you have created a WebApp but not deployed anything to it” screen.
I spent almost the entire weekend doubting myself and wondering why the app wouldn’t start when it was deployed. I’d followed all of the steps in Azure for setting up a GitHub auto deploy, and even used the yml file that it generated for me.
It MUST be the code, right?
So I went back to the code and stripped everything back. I removed all of the documentation, I removed the .NET Boxed stuff that I’d added
pro tip: take a look at the .NET Boxed stuff, it’s great
I removed serilog (I wasn’t getting any logs anyway, because it wasn’t deploying correctly, so I didn’t need the logging code). But none of that was working.
There must be something janky with my Azure account. Right?
There were no logs in the Azure dashboard, so I loaded up the Kudu dashboard
for those who don’t know, if you head to "yoursite".scm.azurewebsites.net and are signed into the Azure Portal, you’ll get some extra stuff to help you debug your WebApps
I could see that the files where being deployed the the Web App perfectly fine, and it was definitely the compiled binaries which where being deployed. Martin Thwaites had a great suggestion:
The other thing to try, which is how I found the problem before, is run the app inside kudu with "dotnet my.dll", you should see the console output then..
— MartinDotNet (@MartinDotNet) Jul 3, 2022
The strangest thing was that none of the Azure web Apps that I spun up seemed to have the dotnet tooling installed, so running dotnet followed by the dll of the application would not work. I would later find that this was a problem completely unrelated to what I was seeing, and it was some weird jankyness with Azure that day.
It’s Always The Yaml
So I’d checked:
- The code
- My account
- The WebApp
The only thing left to check was the deployment yml that Azure had generated. Here’s the original yml in all of it’s autogenerated glory:
# Docs for the Azure Web Apps Deploy action: https://github.com/Azure/webapps-deploy
# More GitHub Actions for Azure: https://github.com/Azure/actions

name: Build and deploy ASP.Net Core app to Azure Web App

on:
  push:
    branches:
      - main
  workflow_dispatch:

jobs:
  build:
    runs-on: ubuntu-latest

    steps:
      - uses: actions/checkout@v2

      - name: Set up .NET Core
        uses: actions/setup-dotnet@v1
        with:
          dotnet-version: '6.0.x'
          include-prerelease: true

      - name: Build with dotnet
        run: dotnet build --configuration Release

      - name: dotnet publish
        run: dotnet publish -c Release -o ${{env.DOTNET_ROOT}}/myapp

      - name: Upload artifact for deployment job
        uses: actions/upload-artifact@v2
        with:
          name: .net-app
          path: ${{env.DOTNET_ROOT}}/myapp

  deploy:
    runs-on: ubuntu-latest
    needs: build
    environment:
      name: 'Production'
      url: ${{ steps.deploy-to-webapp.outputs.webapp-url }}

    steps:
      - name: Download artifact from build job
        uses: actions/download-artifact@v2
        with:
          name: .net-app

      - name: Deploy to Azure Web App
        id: deploy-to-webapp
        uses: azure/webapps-deploy@v2
        with:
          app-name: 'my-web-app-here'
          slot-name: 'Production'
          publish-profile: ${{ secrets.AZUREAPPSERVICE_PUBLISHPROFILE_A_LONG_GUID_HERE }}
          package: .
There’s nothing inherently wrong with this yml… if you only have one project. But this solution had a lot going on, with six projects (and two of them being test projects):
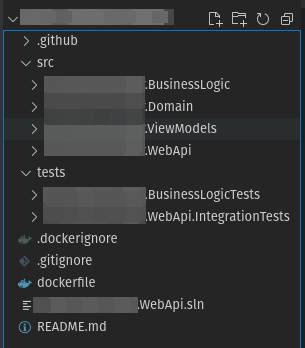
Forgive the project name censoring
The thing about when you run dotnet build --configuration Release in a directory where there’s a solution file present
the .sln file in the screen shot above
is that the tooling will build any and all projects listed in the solution file, copying the resulting binaries to the relevant output directory - in this case bin/Release/net6.0, because it was building a Release configuration. This isn’t a big problem at all.
But because the next line (dotnet publish -c Release -o ${{env.DOTNET_ROOT}}/myapp) did a publish using the solution file the binaries for the test projects ended up in the output directory. This meant that when the project was deployed to the Web App, it included the dlls which exercised the code.
the following is entirely conjecture on my part
Since the startup project was called REDACTED.WebApi and one of the test projects was called REDACTED.WebApi.IntegrationTests, and since they were both present in the deployed code, I THINK that the runtime was getting confused and must have been running the REDACTED.WebApi.IntegrationTests dll instead of the REDACTED.WebApi dll. I think that the presence of the xunit dlls was confusing things, too
these are a dependency of my test projects as I prefer to use xunit over nunit
Meaning that every time I hit the WebApp’s URL, it was re-running the tests.
Azure has some handy metrics to show CPU usage and such for your resources, and I could see the CPU spiking at around 50-70% for two seconds after every one of my failed requests for the WebApp’s url. But after that it would drop to 0% until I put another request in.
The Solution
So I decided to explicitly reference the startup project in my yml file, commit and watch to see if it would fall over. The two lines that I changed from the above became:
- name: Build with dotnet
  run: dotnet build --configuration Release src/REDACTED.WebApi/REDACTED.WebApi.csproj

- name: dotnet publish
  run: dotnet publish -c Release -o ${{env.DOTNET_ROOT}}/myapp src/REDACTED.WebApi/REDACTED.WebApi.csproj
Instead of building all of the projects referenced in the solution file, these two lines tell the tooling to only build the REDACTED.WebApi.csproj project and it’s direct dependencies.
Lo and behold, when I pushed this yml change up to GitHub, it built, deployed the binaries, and everything started working… finally.
Conclusion
I intentionally haven’t included in this blog post everything that I tried to get this app to deploy correctly. I tried a number of other things including but not limited to:
- Putting the app inside a docker container
- Shouting rather loudly
- Not sleeping
- Stress eating some pizza
- Scratching my head
- Asking on Twitter
But at the end of the day, all I needed to do was follow the advice of Abel Wang:
Don’t accept the defaults!
I’ve almost always explicitly referenced the csproj that I want to build and deploy with other solutions that I’ve worked on. Not out of any kind of arcane knowledge, but just because I’m only ever interested in the result of building one very specific project. And the one time that it was required, I forgot to do it.
So don’t accept the defaults, and always explicitly reference the project you want to build.